When you frequently use a certain tier type with a limited number of annotation values, it might be a good idea to associate a Controlled Vocabulary (CV) with it. Such a CV consists of a number of predefined values that a user can choose from when editing an annotation, thus making the task of the annotator less error-prone. E.g. one can choose to create a controlled vocabulary for part of speech tagging, as the tags that are used often reoccur. In order to do this select > . The following dialog will appear:
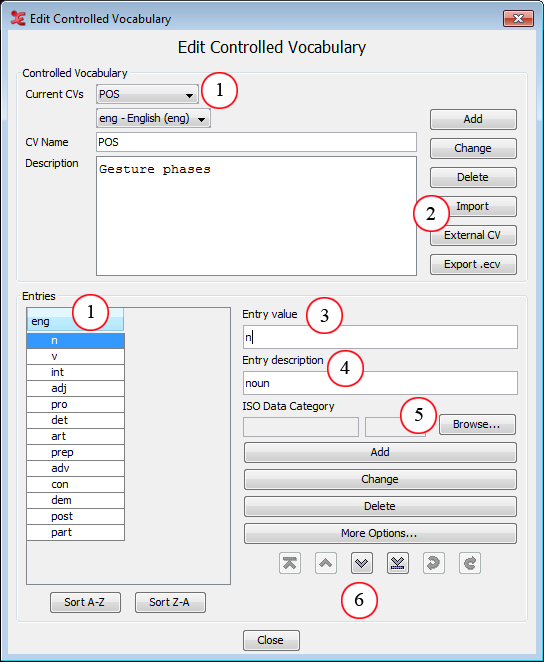
Figure 2.31. Edit controlled vocabulary
The CV being edited , the entries and the set language.
Import & export options, link to an external CV.
Annotation value as it is going to be filled in.
A description of the entered value.
Association with an ISO Data Category.
Buttons to move the selected entry up/down, top/bottom. Undo/redo changes to the CV.
To create a new CV, do the following:
Enter a CV Name and a description. ( Each language within a CV can have a different description)
Click on the button
Choose a language from the pull-down menu (see Section 2.6.2 for more info on setting a language.)
Now enter each CV entry and its description.
Confirm every entry addition by clicking on the button or by hitting . When adding entries for an additional language, click to add a new entry, or click to add the entry next to an existing entry.
![[Note]](images/note.png) | Note |
|---|---|
The undo function in the CV dialog window only works as long as that window is active. Once it is closed changes cannot be undone any more. |
By clicking (not yet shown in the figure above) you can choose a color that will fill the lower part of every annotation frame containing the selected CV entry. Moreover, you can choose a shortcut key to edit an annotation with a single key stroke.
The color chooser has four tabs. The last three contain different ways to choose a color, which is subsequently displayed in the lower part of the window. In the first tab you can add or insert the color displayed below and you can copy, paste and delete the selected color. The list of favourite colors is saved and used the next time you start ELAN.