Normally ELAN allows to edit only a single file at a time. There are situations in which it is convenient to edit multiple files at once. The menu item gives a number of options to do just this. When selecting either of them, you are warned that you should have copies of the files you are going to work on in case you want to restore the files (there is no Undo for multiple file edits).
When you choose this option , you see the following dialog.
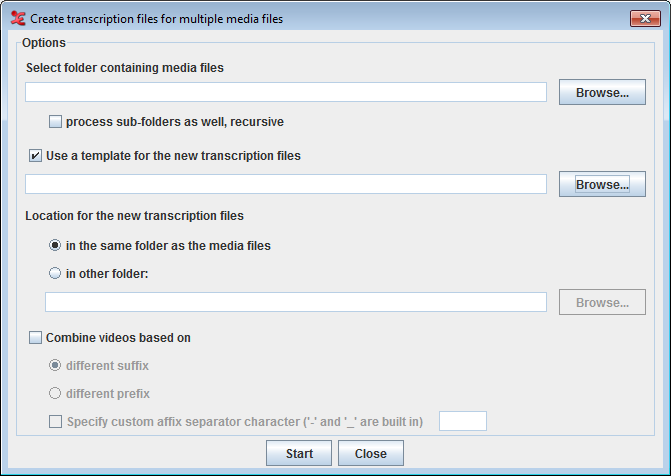
Options :
Select folder containing media files : click button to select the folder containing media files.
check this option process sub-folders as well, recursive to include all the media files in the recursive sub-folders of the selected folder.
To apply a template (only if required) for the new transcription files, check this option Use a template for the new transcription files and click on button to select the template file.
Next option allows you to select a location for the new transcription files.
To put the transcription files in the same folder as the media files, select in the same folder as the media files.
To put them in a different folder, select in other folder and click the button to select the destination folder.
You could always have more than one media file in a transcription. In order to group the media files for a transcription, check this option Combine videos based on. In order to define how the media should be grouped, select one of the following:
different suffix : to combine the media file with a different suffix and has the same file name.
different prefix : to combine the media file different prefix value and has the same file name.
To specify a separator in the file name to identify the suffix or prefix, check this option Specify custom affix separator character ('-' and '_' are built in).
Click on Start to create the transcriptions based on the options set.
The option shows, after clicking in the warning dialog mentioned above, the Multi File Editor. The first thing to do here is to load a domain by clicking . Loading a domain is the same as for the option. To be able to load a domain you must of course have created one beforehand (see Section 1.9.1). After loading a domain, the data is shown in the table. In this table you can edit tiers on the Tiers tab and tier types on the Tier Types tab.
To edit a name, annotator or participant of a tier, double click the corresponding table cell or select it and start typing. To change the tier type of a tier, select one from the drop down menu. You can add a tier by clicking , add a depending tier by clicking and remove one by clicking .
![[Note]](images/note.png) | Note |
|---|---|
If there are hierarchy inconsistencies (e.g. if a tier in one file does have a parent while a tier with the same name in another file does not) removing tiers is not possible. The button is therefore greyed out. |
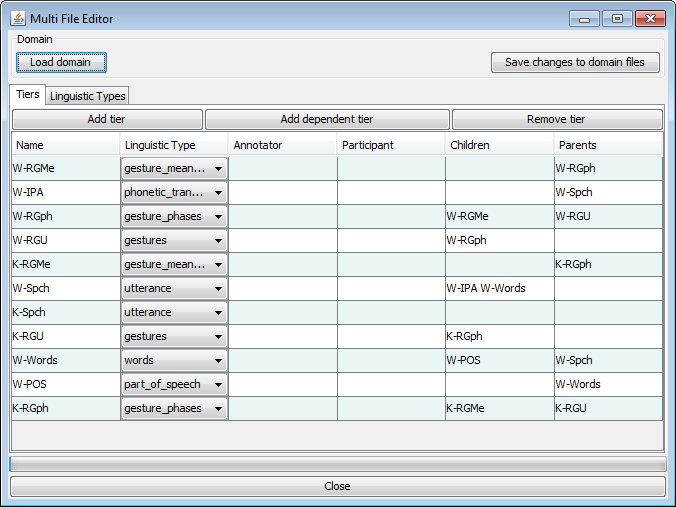
On the Tier Types tab, the name of a tier type can be changed by double
clicking the corresponding table cell in the Type Name column.
Changes made in the Tiers and Types tabs are applied to all the files in the domain after clicking the Save changes to domain files button.
When you choose , you first need to specify a new domain or select an existing domain. This option helps you to "clean" the annotation files (*.eaf) of possible tabs or white space characters which are often overlooked by the user but are still saved in the file. To select, create or delete a domain see Section 1.9.1.
In the next dialog, you can specify what characters to delete, new line characters, tab characters and/or white space characters, and in what position these characters have to be. Click to start the scrubbing process. The progress of the scrubbing is shown in the progress bar.

The option for multiple files is the same function as annotations from overlaps in the current open file (see Section 2.14.1 ), but applied to a selection of files. The first step allows to select a custom set of files in a file browser or to load a set of files that have been stored as a domain. For loading or creating new domain see Section 1.9.1 The list of tiers is the sum of all tier names encountered in the selected files. The options in the next steps are the same, clicking the Finish button in the last step the new tier is created and populated with annotations in all files of the domain.
In some projects two or more annotators annotate the recordings and the need exists to assess the level of agreement, in order to be able to improve the training of the annotators and in the end the annotation quality. Several algorithms have been implemented and are being applied in research projects but there doesn’t seem to be consensus on what the best approach is for this type of data (time aligned annotations). The option allows to calculate an agreement measure for annotations on multiple tiers in multiple files, providing three different methods based on existing algorithms. Even though multiple tiers can be selected, the comparison is always performed on pairs of tiers. These methods are provided “as is”. Implementation of other algorithms might be added later, if time allows. The three methods are:
calculation of (modified) Cohen’s kappa according to Holle & Rein
calculation of (modified) Fleiss’ kappa
calculation of the ratio of the overlap and the total extent of two annotations
calculation of the degree of organization using Staccato
Using the function requires a few steps to be taken. Some of the steps differ depending on the choices made; other steps are common to all methods. The steps and their availability depending on the choices made are described below.
1. Method selection - selection of the algorithm that will be applied
2. Customization of the selected method (if applicable )
3. Document and tier configuration
4. Select files and matching (not available when current document & manual selection is chosen)
5. Tier selection
6. Execute the calculation and save the output file
The following sections will describe each step of the process in more detail.
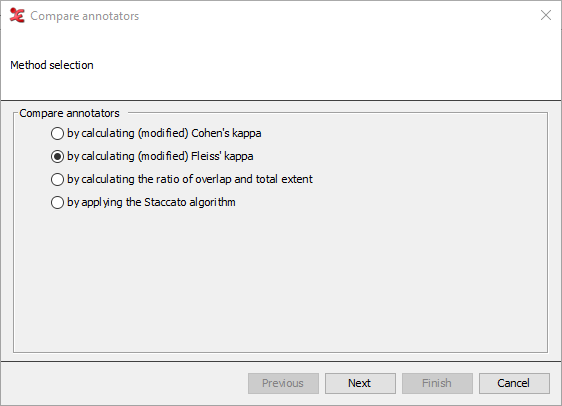
The first step in the process allows you to select a method of comparing. Depending on what method is selected, the steps after that will differ. The options to choose from are:
By calculating modified Cohen’s kappa:
This option implements (part of) the Holle & Rein algorithm as described in this publication: Holle, H., & Rein, R. (2014). EasyDIAg: A tool for easy determination of interrater agreement. Behavior Research Methods, August 2014. The manual of EasyDIAg can be consulted for a detailed description and explanation of the algorithm.
By calculating modified Fleiss' kappa:
This option provides a modified implementation of Fleiss' kappa. The modification concerns (as is the case for the modified Cohen's kappa implementation) the matching of annotations to determine the "subjects" or "units" and the introduction of the "Unmatched" or "Void" category for annotations/events that are not identified by all raters. If the raters only have to apply labels to pre-existing segments, the problem of matching annotations does not exist. Fleiss' kappa works for two or more raters (the other options are limited to two raters).
by calculating the ratio of overlap and total extent:
This is a simplified version of the function that used to be under > . It calculates a raw agreement value for the segmentation, it doesn't take into account chance agreement and it doesn't compare annotation values. The current implementation only includes in the output the average agreement value for all annotation pairs of each set of tiers (whereas previously the ratio per annotation pair was listed as well).
by applying the Staccato algorithm:
This will compare the annotations (the segmentations) of 2 annotators using the Staccato algorithm. See this article for more information on the Staccato algorithm: Luecking, A., Ptock, S., & Bergmann, K. (2011). Staccato: Segmentation Agreement Calculator according to Thomann. In E. Efthimiou G. & Kouroupetroglou (Eds.), Proceedings of the 9th International Gesture Workshop: Gestures in Embodied Communication and Human-Computer Interaction (pp. 50-53) .
Once you choose a method, click to continue. Note that when the Kappa or Staccato are chosen, the next step will be 'Customize compare method'. Otherwise the next step is 'Document & tier configuration'.
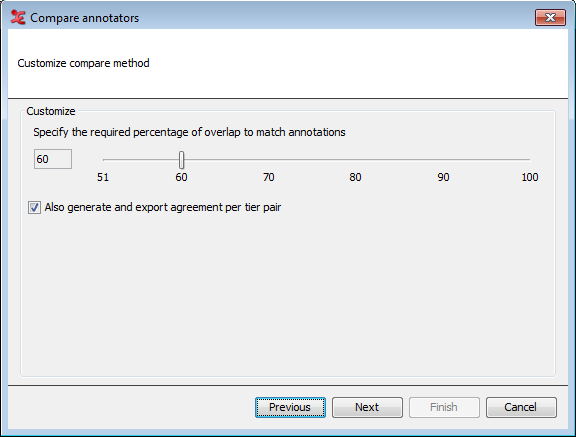
When the modified Cohen's kappa method is chosen, this step allows you to specify the minimal required percentage of overlap. This is the amount of overlap as a percentage of the duration of the longest of the two annotations. The higher the percentage, the more the annotations have to overlap to match.
You can choose to generate and export agreement values per pair of tiers, in addition to the overall values. Since this algorithm compares annotation values as well, it is best to select tiers that share the same (controlled) vocabulary. When done, click .
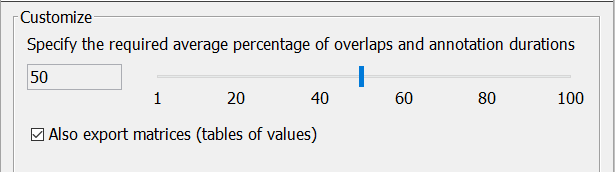
The options for Fleiss' kappa are slightly different; the slider here allows to specify a percentage between 1 and 100. Since there can be any number of raters, the annotation matching algorithm tries to create clusters of as many overlapping annotation as possible, taking into account the required average of the percentages of the overlap and each involved annotation's duration. The figures below try to illustrate the problem.
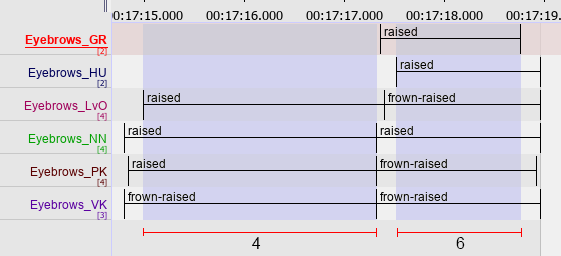
Figure 1.146. Six raters, two possible clusters of four and six matching annotations, the overlap in light blue
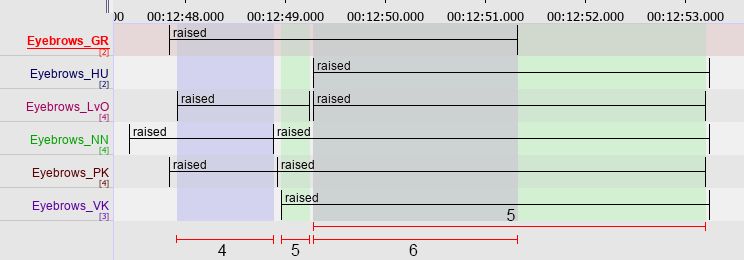
Figure 1.147. Six raters, four of the possible clusters of matching annotations are marked in blue and green
The algorithm gives preference to clusters with more annotations, as long as the required average percentage of overlap is met. If not, a cluster with less annotations is selected. Each annotation can only be part of one cluster.
The checkbox allows to not save the tables of values (see the worked example at Wikipedia), but it is recommended to accept the default.
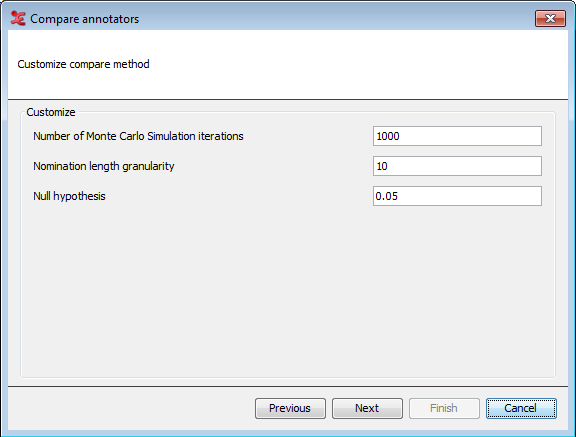
When you've selected the Staccato algorithm as the compare method, the settings as shown above will appear. You can customize the settings for the Staccato algorithm here. This algorithm takes chance into account by comparing the segmentation with a series of randomly generated segmentations, the Monte Carlo simulation. The nomination length granularity determines how many memory slots for segments of different length will be used internally. For more in-depth information regarding these settings, please see the reference article mentioned before. When done, click .
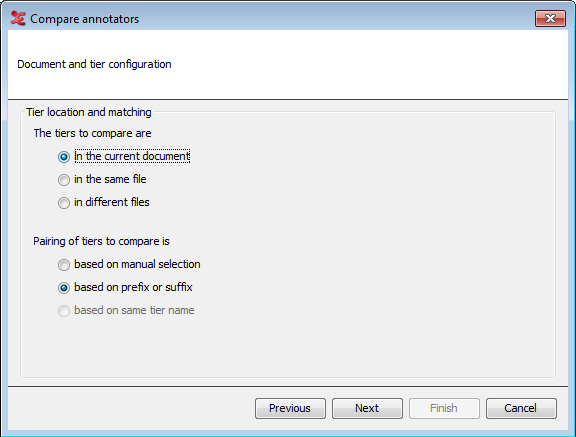
The next step is to configure where the tiers that you want to use for comparison are located and how they should be paired. In the upper part of the dialog, you select the location of the tiers:
In the current document (available when you have an .eaf file open, otherwise this option will be greyed out)
In the same file (choose a single file in the next step)
In different files (choose multiple files in the next step)
In the lower part of the dialog, you can select in what way the pairing of tiers to compare is done:
Based on manual selection (select tiers from a list in the next step)
Based on prefix or suffix (customize in the next step)
Based on same tier name (only available when the option 'in different files' is chosen)
When done, click to continue.
Next, you will select which files you want to use for comparison and how to match tiers.
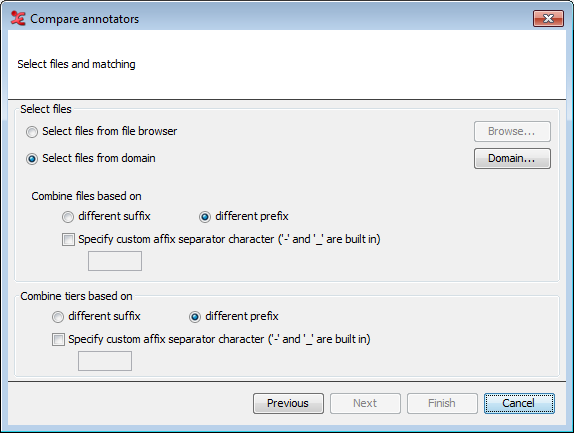
The screen above shows all possible options. The options available for this step will differ depending on the configuration you made in the previous step. It will not be available when the option 'in current document' together with 'based on manual selection' was chosen in the previous step.
Select files from file browser Browse for one or more files that you wish to use.
Select files from domain Choose or create a domain of files to use, see Section 1.9.1.
Combine files based on different suffix/prefix When using multiple files, choose how they should be combined. E.g. if there is a certain naming convention for the files and the annotations of the first annotator are in files like "Recording4_R1.eaf" and those of the second annotator in files like "Recording4_R2.eaf" and suffix has been selected, these files will be combined automatically.
Combine tiers based on different suffix/prefix Similar as with files, when a certain naming convention has been used for tiers of different annotators, they can be combined on the basis of a prefix or suffix, e.g. A_LeftHand and B_LeftHand in case of prefix-based matching.
If Fleiss' kappa was selected and the tiers to compare are in different files, an option is available to create and store new EAF files containing the matching tiers (experimental).
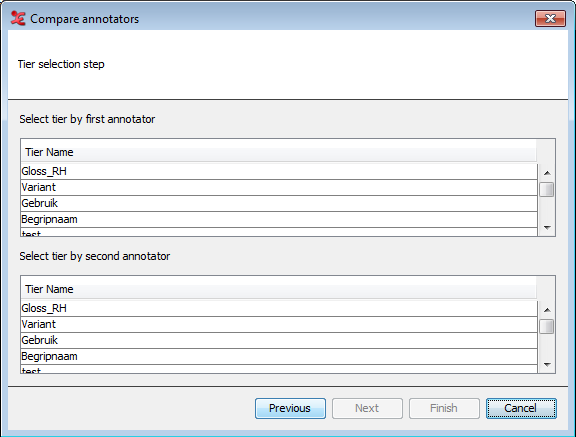
In this last dialog, you will select the tiers used for comparison. The layout will be different, based on what you selected in previous steps. The screen above displays the dialog when you've chosen the option 'In the current document' & 'based on manual selection' in step 3. You can manually select which tiers to compare.
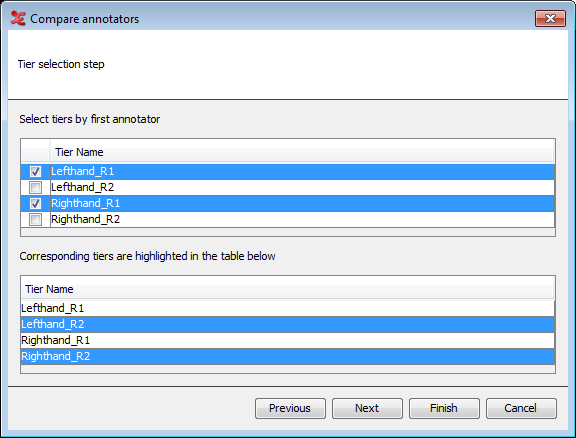
The dialog above will appear when 'based on pre/suffix' in step 3 is chosen. Marking a tier from an annotator will result in a highlighted corresponding tier in the lower part of the dialog. When 'based on same tier name' was chosen, you can only select tier names, corresponding tiers will not be visible in the dialog.
Finally, click Next or Finish to save the output text file to a location on your computer.
The option for multiple files is the same function as annotations from subtraction in the current open file (see Section 2.15 ), but applied to a selection of files. The first step allows to select a custom set of files in a file browser or to load a set of files that have been stored as a domain. For loading or creating new domain see Section 1.9.1 The list of tiers is the sum of all tier names encountered in the selected files. The options in the next steps are the same, clicking the Finish button in the last step the new tier is created and populated with annotations in all files of the domain.
This function is similar to annotation statistics for the current file (see Section 2.18.2). The main difference after selecting the files in the domain is that it is possible to select which tiers to include in the calculations. The tables in the tabs do not have the column showing the total annotation duration as a percentage of the media duration but most do have a column for the number of files a certain value (tier or type name etc.) has been encountered in. After changes in the selection of files or in the selection of tiers the Update Statistics button needs to be clicked before the new calculations are started.
Since ELAN 4.7, you are able to do an N-Gram analysis over multiple eaf files. This functionality has been developed by Larwan Berke, you can find an extensive PDF document about this implementation on the third-party resources page of ELAN: https://archive.mpi.nl/tla/elan/thirdparty
When you first open the N-gram analysis, a new dialog window will pop up that contains the various options for the search and the resulting table showcasing a few statistics.
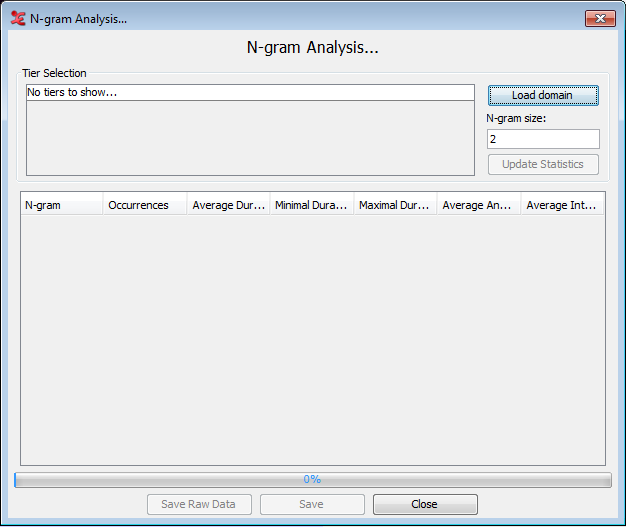
The first step is to select the search domain, see Section 1.9.1. Once that is done a list of tiers seen in the domain will be shown. A note of caution: the code assumes that all files in the domain will contain the same tiers. It then loads the first file in the domain to extract the tiers and display it in the window. Check the tiers you want to analyse.
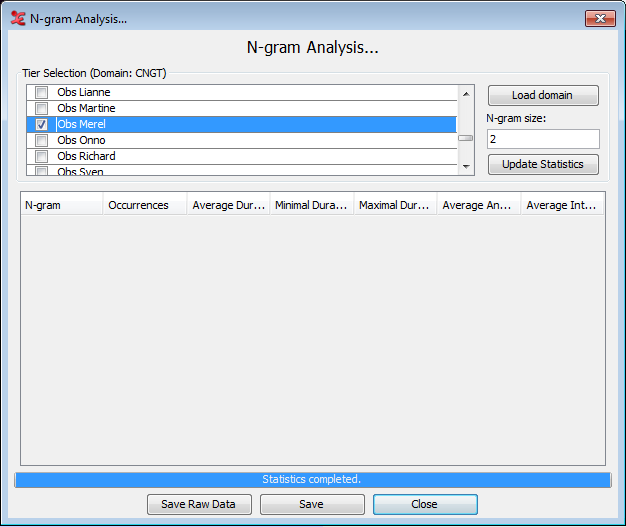
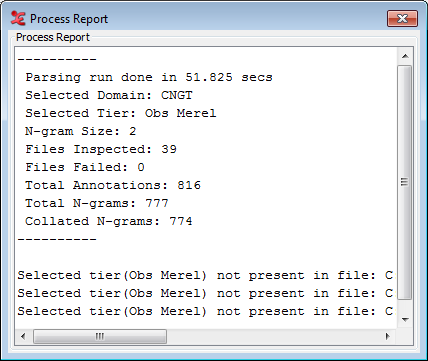
Next, define the N-gram size in the text box. The software can handle any positive size greater than 1. When set, clicking the “Update Statistics” button will start the search and will calculate the statistics. The annotations are extracted from the files, N-grams created from them, and finally collated into groupings of same N-grams for statistical analysis. When done, you will see a pop-up window with a process report. If there were any errors, they will also be displayed here.
When the search is done, the result table will be displayed in the main window. Some of the columns from the data are visible here, however only a small subset is displayed simultaneously to avoid overcrowding the GUI. The visible columns are: N-gram, Occurrences, Average Duration, Minimal Duration, Maximal Duration, Average Annotation Time, and Average Interval Time.
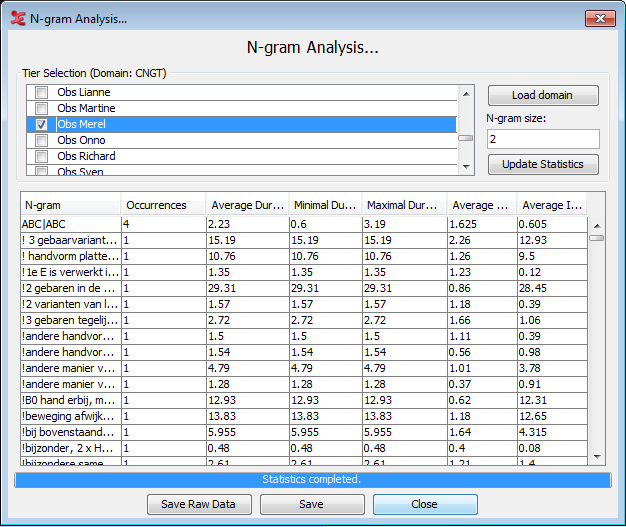
The first column shows the N-gram. The vertical marker “|” separates the annotations contained in the bigram. For example, if a trigram was selected it would show something similar to “FINISH|READ|BOOK” and so on for larger N-gram sizes.
Finally, in order to see the entire data that was produced it is necessary to export the results into a text file for further processing. This is done by clicking on the “Save” button and a dialog will pop up asking the user where to save the data. It is exported in a CSV-like format (Comma-Separated Values). The CSV file uses tabs “\t” as the delimiters and newlines “\n” as the record separators to avoid ambiguity with the values. A sample row is: “HOLD|IX-1p\t7.9934\t0.348\t0.13754 ...” and contains numerous columns.
Furthermore, it is possible to export the N-grams individually in order to process it separately from ELAN. The data is exported by clicking the “Raw Data” button in the GUI. After supplying the file the data will be exported in the same CSV format as discussed above. For more in-depth information about the N-Gram analysis function and the resulting data, please consult the PDF mentioned earlier on the ELAN website, or consult it here: https://parasol.tamu.edu/dreu2013/Berke/images/DREU_Final_Report.pdf (This link may become outdated at some point).
Apart from exporting part of a clip in a project (see Section 1.4.1.18), you can also export multiple clips from the same (or multiple) projects. The clips will be clipped based on the annotation-times on a specified tier.
As with the exporting of a part of a clip, Windows users will need to put a copy of ffmpeg.exe or ffmbc.exe in the program folder of ELAN. ( see Section 1.4.1.18) for more info.
To utilize this function, you will need to create a tab-delimited text file first. Go to > > . (note, this will not work for the single file tab-delimited export, as there is no option to include the videofile-path). Choose a domain, or create a new one (if you want to create multiple clips from only one .eaf, create that .eaf as a new domain). Select the tiers you want to include in the Tab-delimited text file (each annotation on a tier will result in a clip).
Make sure you check the following options:
Exclude tier names from output
Exclude participant names from output
Include file path column
Under the time column and format options, you will need to check:
Begin Time
End Time
Duration
ss. msec
The other options have to remain unchecked. Next, click and the file will be exported to a text file.
Go to > > . Choose the exported tab delimited text file you just created, and specify a folder to save the clipped videos to. Click to start the process. When done, a process report dialog will appear with information about the clipping process.
Similar to merging tiers within a single project (see Section 2.4.6), this function allows you to merge tiers in multiple projects. This means the merged tiers will be added to each project you select in the process.
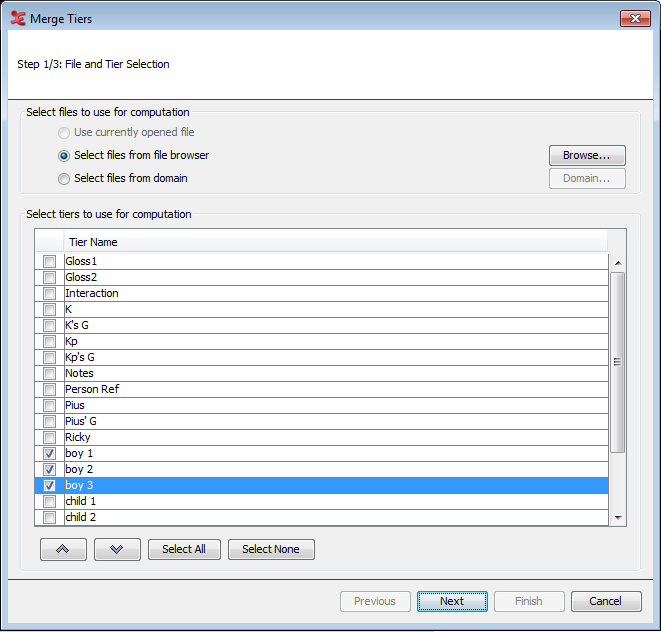
To start, click > > . You will be presented with a dialog in which you either select the eaf files from the file browser, or select files from a domain. When done, select the tiers to use for the merging process.
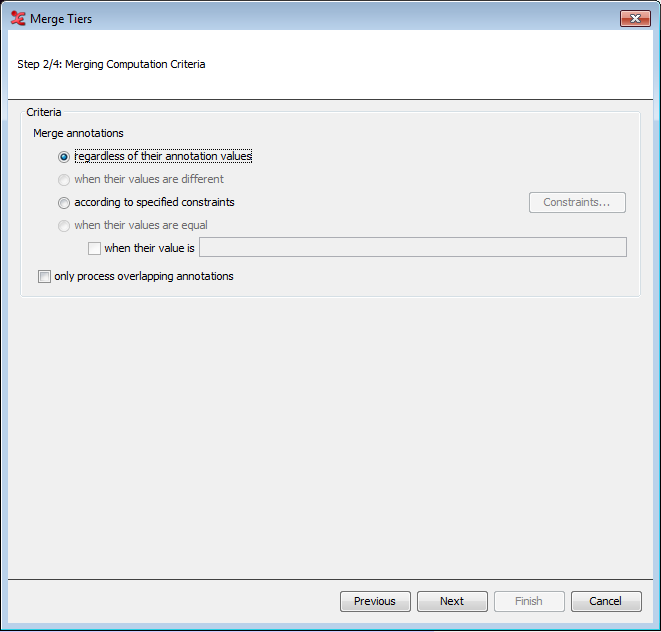
Next, select the merge criteria, either regardless of the annotation values or according to specified constraints within the annotations of a chosen tier. When checking the option Only process overlapping annotations , ELAN only merges annotations that have the same value. In this case, the values of both annotations are not concatenated, so the created annotation contains the value only once.
In the next step, set a name for the destination tier and decide whether this tier will be a root tier or a child tier. Also select or create a tier type for the new tier.
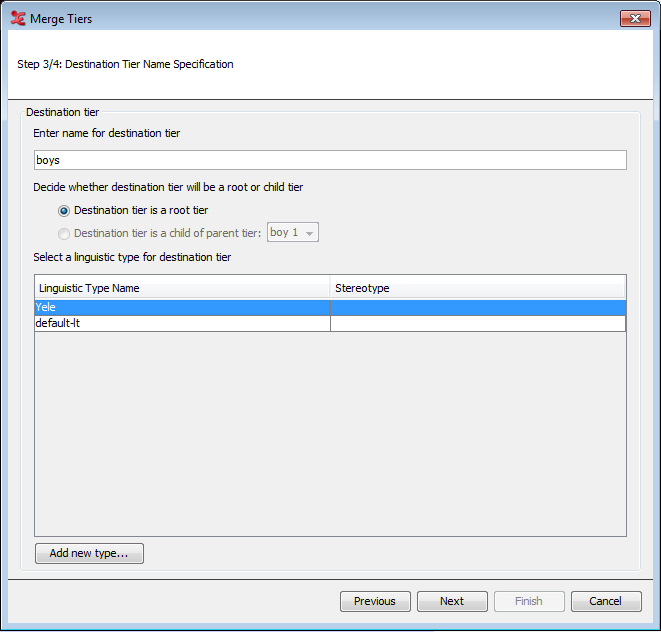
Lastly, specify the value for the destination tier. You can set a value in a time format, which will put in the specified time values inside the annotation units on the new tier. You can also choose to set a specific value to be filled out into the annotation units. The final choice is to concatenate the values of the annotations from the tiers you have selected for merging.

After clicking , the tiers will be merged and inserted into each eaf you chose at the start. A process report will show an overview of what has been done.
If one or more of the tier types of a transcription are linked to ECV's (External Controlled Vocabularies, see Section 2.6.5) and annotations have been created using those ECV's, it might be necessary to update existing transcriptions after changes have been made to those ECV's. This function allows to update an entire corpus or a selection of files.
If you choose the option , you'll see the following dialog:
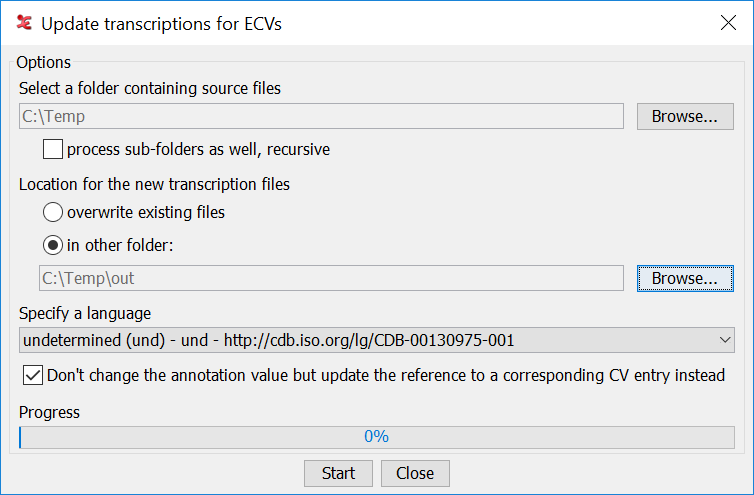
First a source folder containing the transcription files should be selected, specifying whether or not sub-folders should be processed too. For the destination it is possible to choose to overwrite the existing source files (this should only be done if there are recent back up copies of the files) or to select a folder where the updated transcriptions should be stored. Furthermore it is possible to specify which content language to use; this is only useful if the ECV's are multilingual.
The default behavior of this update action is to change annotation values after changes in an external controlled vocabulary, based on the reference of the annotation to (the id of) an entry in the controlled vocabulary. The option allows to change this default behavior; instead of updating an annotation value based on a reference to a CV entry, it checks if the annotation value is still in the controlled vocabulary and, if so, updates the reference or, otherwise, removes the reference.
When the files of a corpus are based on a template, the need can arise during the project, to update all files with new tiers, tier types and/or new controlled vocabularies. To achieve this, the template can be updated with the new elements and the changes can then be applied to the files. It is also possible to create a new template with only the new tiers and types etc. and use that one for the updating, because new elements in the template will be added but existing tiers, types and CV's etc. in the .eaf files will not be deleted if they are not (or no longer) in the template.
To start the process of updating a set of files, choose A message will be shown, warning that there is no undo for the changes that are going to be made to the files. Then this dialog will be shown:
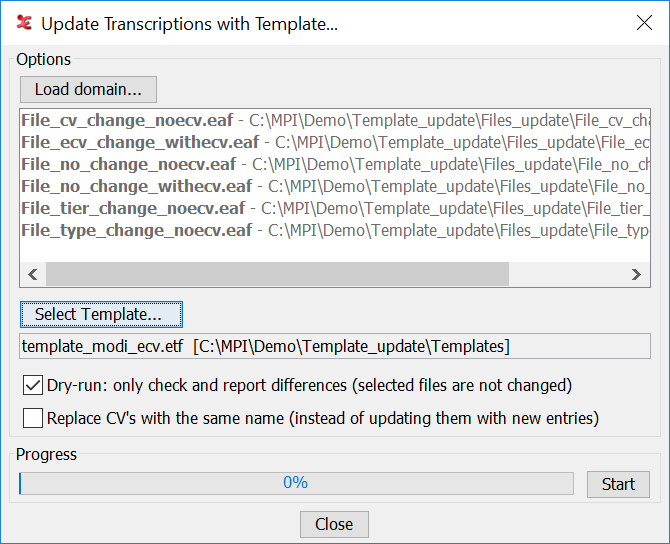
The following options are available:
The button allows to select the files to update.
The button allows to browse to the template file containing the new elements.
The checkbox ensures, if selected, that the selected files will not be changed. After clicking the button the files will be compared with the template file and a report will be shown, listing the detected differences.
The checkbox determines that existing CV's will be replaced by the CV with the same name in the template. If this checkbox is not ticked, new entries in the CV with the same name in the template will be added to the CV in the file (while new entries in the CV in the file will not be removed if they are not in the CV in the template).
The button starts the update process. After the last file has been processed a report will be shown with a listing per file of the differences and of the changes applied. The report can be saved as a
.txtfile
Apart from adding new elements to the existing files, this process also allows to update some properties of existing elements, as long as these changes can't result in data loss. E.g. the Annotator and Participant properties of a Tiercan be updated, but not the Parent Tier. The Tier Type of a Tier can only be changed to a Type with the same overall constraints (Stereotype). The Controlled Vocabulary property of a Tier Type can be changed, but not its Stereotype. Controlled Vocabularies can be converted from internal to external or the other way round. Etc.